Selling Recurring Plans
-
At the top of any Pike13 page click Clients.
-
Select the client making a purchase, and click the New Purchase button.
-
On the Choose a product page, search the recurring plan to purchase.
-
If the client manages other clients, choose who will use this recurring plan, and click Add to Cart.
-
Select Modify, and then doing any of the following:
-
Payment info: Change the plan start date, first payment due date (now or on the plan's start date if it's in the future), second payment due date, process manually or with automatic payments.

-
Pricing: Change the price this client will pay

-
First Invoice Adjustment: Only applies when there is proration applied for the first payment

-
Discounts: Discount by a percentage or set amount off for the first payment or all payments

-
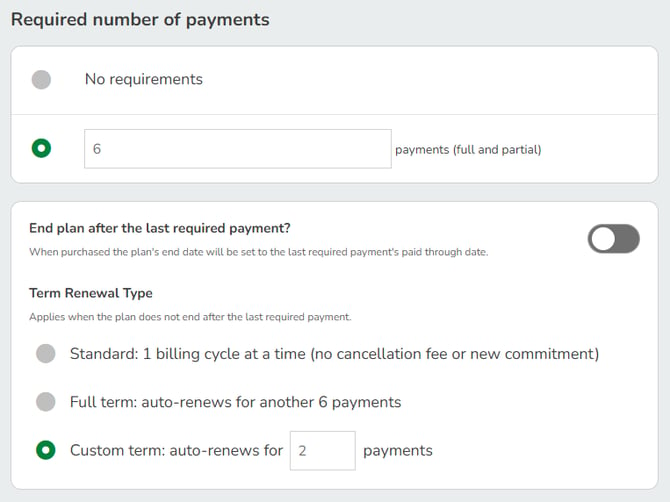
Required number of payments: Plans may have a minimum number of payments due before cancelation fees can be waived. Plans that have their terms auto-renew for additional required payments may be modified here.
-
Restrictions: Change the number of visits allowed per day, week or month; change roll over visit rules.

-
-
When finished, click Back to Shopping Cart.
-
If applicable, under TOTAL click Enter coupon code, enter the code, and then click Apply.
-
Tap Secure Checkout.
-
Ensure the Location is correct.
-
Choose whether or not to send an email receipt to the client. The default is Yes. Ensure the email address is correct.
-
Click Choose a payment method, and then choose a payment option.
-
To make a full payment, check that the full payment amount is correct, specify who should receive a sales commission, the location of sale, and whether to email the client a receipt, and then click Finish.
-
To make a partial payment, enter an amount that is less than the total, specify who should receive a sales commission, the location of sale, and whether to email the client a receipt, and then click Make Partial Payment.
-
To split a payment between payment methods, enter an amount that is less than the total, specify who should receive a sales commission, the location of sale, and whether to email the client a receipt. Click + Add another payment, choose the second payment method, and then click Finish.
-